Showing posts with label what we are cooking. Show all posts

Friday, April 11, 2014

Cottage Pie

What does one do when she has not ONE but TWO beef cows purchased, wrapped and frozen in not ONE but TWO commercial size freezers? (That is a whole other story as to how we ended up with two beef cows in such a short period of time)

I began scanning pinterest and many of my favorite blogs searching for new and creative ways to use ground beef.  Some of our family favorites are Shepherd's Pie, Sloppy Joe's, Enchiladas and of course Cheeseburgers.  But, when the kids began saying, "hamburger again," I realized it was time for intervention.

I actually stumbled across this blog, Farmstead Cookery, late one night, which spoke to my more mindful desire to cook from scratch, and eat wholesome, healthy organic meals all from what we've grown or obtained from local sources.

The General Manager is a meat and potato man and must have meat with every meal.   I gave up years ago trying to fix meatless meals to stretch our food budget, so now I just try to find casseroles or one dish meals that include either chicken or beef that feed a family of seven.

The first recipe that caught my eye that night was Cottage Pie. It had all the essential elements, meat, potatoes and lots of CHEESE!  It won rave reviews by everyone in the family and was unanimously declared, "A Keeper."


I even had a helper when it came time to making the mashed potatoes.  Coupled with a jar of home grown green beans made for a wonderful meal.


Cottage Pie
 
Ingredients
  • 3 T. olive oil or tallow
  • 2 garlic cloves, mashed
  • 1 small onion, diced
  • 1 lb. ground beef
  • 1 t. fresh thyme leaves
  • ½ c. red wine
  • 1 c. beef stock, divided
  • 1 t. Worcestershire sauce
  • 1 T. tomato paste
  • 2 T. butter, melted
  • 4 T. flour
  • salt & pepper
  • 3 lb. potatoes, chopped
  • 1 c. milk, boiling
  • salt & pepper
  • 2 T. butter
  • 1 T. chives, chopped
  • ¼ c. Parmigiano Reggiano
  • ¼ c. cheddar cheese, grated
Instructions
  1. Preheat oven to 350.
  2. Warm up the fat in skillet.
  3. Add the onion and sauté over medium heat until it softens & begins to slightly brown.
  4. Add in the garlic for and cook for another minute until it’s fragrant.
  5. Increase the heat and add the beef and thyme, browning..
  6. Add the wine, ¾ stock, Worcestershire, & tomato paste.
  7. Simmer for 10 minutes.
  8. Meanwhile, boil the chopped potatoes until fork tender (time varies depending on how small you chopped them.)
  9. Drain and mash the potatoes.
  10. Bring the milk to a boil in a small saucepan and add to the mash while they are still hot.
  11. Season, adding the butter & chives.
  12. Make a thick roux by whisking 4 T. flour into 2 T. butter, cooking over low for 2 minutes.
  13. Bring rest of the stock (¼ c.) to a boil and whisk in enough roux to thicken (should still be a little juicy).
  14. Stir into beef and adjust your seasonings to taste.
  15. Spoon the saucy beef into a large dish. (I used a 10″ cast iron skillet.)
  16. Spread mashed potatoes on top.
  17. Sprinkle with cheeses.
  18. Bake in the preheated oven for 30 minutes until the top is golden & slightly crispy.
 
 
Enjoy your weekend!

Wednesday, June 26, 2013

From this to that. . . Strawberry Rhubarb Jam


Who would have thought that four years ago when I was gifted the roots of this rhubarb plant, that by planting it I would be able to one day take this plant. . .  and


the strawberries that we planted around the same time in our ever expanding garden . .  and turn it into this yummy, fire red, sweet jam.

It was my Dad that inspired the whole long journey to this jam because of his love for rhubarb.  When I was a child he used to make a rhubarb syrup that we would use for pancakes, waffles and always on ice cream.  While I don't remember whether I liked it or whether I turned my nose up at it, which my children do on many of my dishes today, my memory is more of my Dad in the kitchen making it and how much he enjoyed rhubarb.  It brings my heart joy to think that this jam, and every successive jar that I can each year afterwards will bear the same story.  It is my greatest hope that my children will fondly recall these stories as they get older. 


Ingredients

  • 3 cups strawberries
  • 3 cups rhubarb
  • 4 tablespoons lemon juice
  • 1 3/4 ounces powdered pectin
  • 5 1/2 cups sugar

Directions

  1. In a large sauce pan, combine the strawberries and rhubarb. Crush the mixture together (I use my potato masher), and then add in the lemon juice. Bring to a boil and then let simmer, stirring frequently, until the rhubarb breaks apart.
  2. Prepare your canning supplies. Bring the temperature of the glass jars up by processing them in hot water for several minutes, and heat a few cups of water in a small saucepan for the lids.
  3. Stir in the pectin until dissolved. Bring back to a boil, and then add in the sugar all at once. Boil hard for a minute longer.
  4. Skim off any foam and ladle the hot jam into the hot jars, leaving 1/4″ headspace.
  5. Place the lids and bands on top, screwing on the bands just until fingertip-tight. Place the full jars back into the boiling water and process 10 minutes.
  6. Remove from the water and place the jars on a towel. Let the jars cool. The seals should suck down (you’ll hear a popping noise as they do). Makes 7-8 eight-ounce jars.

Source: Food Fanatic

Thursday, August 2, 2012

Creamy Carrot Zucchini Soup

Here it's already July and I am still anxiously awaiting our squash to grow this season.   Our coastal area has not seen much sun during the month of July.  It seems the hotter it is inland, the more marine layer we get like a thick soupy fog over us.  Even through this layer of fog, the garden is producing an abundance of lettuce, chard, kale, radishes, spinach and carrots.  I have even harvested a few onions.  The snap peas are close to harvest and I still have high hopes for our pole beans which haven't flowered yet.. . .  But NO squash.

So, when the general manager brought home freshly harvested zucchini and green peppers from  one of his customers in warmer country than us, I knew just which recipe to try.  It has been sitting on my pinterest board just awaitin' to be fixed up for one of our Northwest foggy days.


Creamy Carrot Zucchini Soup, found on Natures Nurture blog was so easy to fix and even more yummy than I expected.  I might have even got the kids to try the soup, but they all watched the zucchini go in the pot.  That was the end of the soup for them!  Maybe one day their taste buds will change and they'll realize how yummy zucchini really can be, but for now, I'll continue to find ways to hide it in their foods. . .preferably when they are not looking.

Have you tried any new recipes lately?
Blessings,
Michelle


Friday, April 27, 2012

something rather addicting

Our family absolutely loves Italian food and some of them thought me crazy when I canned up 28 quarts of fresh tomatoes last year.  They thought me even crazier when I said that it probably wouldn't last until next year's harvest.  I hate to admit I was right, but we are down to our last 8 or 9 jars which will not last until this August when we get tomatoes from a local grower.  I dream of growing tomatoes, but unless I build a hoop house, like our dear friends, I will not see tomatoes here on the coast - we are just too damp and cold through the summer months.

Since moving to the far northern reaches of California, which is entirely void of most metropolitan restaurant chains some of the family has been going through severe withdrawals.  One of our favorite restaurants to visit on special occasions was Olive Garden.  It never seemed to fail that everyone ordered the soup and salad.  I have a recipe that nearly replicates the Sausage Toscano soup which everyone has enjoyed, but it's the salad dressing that I have yet to figure out.

Until. . . .
the other day when I was perusing around pinterest and I came across this recipe called "Olive Garden Salad Dressing the Traditional Foods Way."

Since, I am working on cooking foods in a more traditional manner my interest was piqued!


Olive Garden Salad the Traditional Foods Way:
  • 1/2 c. mayonnaise (preferably homemade)
  • 1/3 c. white wine vinegar
  • 1 tsp. olive oil
  • 2 tb. honey
  • 2 tb. each of grated Parmesan cheese and Romano cheese
  • 1 clove of garlic, crushed
  • 1/2 tsp. Italian Seasoning
  • 1/2 tsp. parsley
  • 1 Tb. lemon juice
  • dash of salt and pepper
Pulse all ingredients in a blender until thoroughly combined and cheeses are finely minced. Drizzle over a green salad to taste and voila! No preservatives or corn syrup here!

I wanted to be the first guinea pig to try this, since we have pretty observant food critics in our home.  At first, it had a very strong lemon/vinegar taste, but over the last few days while it has settled into it's flavors in the refrigerator, it's turned into something that is quite delicious.  While it still does not match the Olive Garden dressing I remember so fondly, I highly recommend making this dressing.  It's flavors sneak up on you and it has a very nice creamy consistency.

Just so that you can compare recipes, here's another Olive Garden Salad Dressing recipe from a blog called Everyone's Gotta Eat.  Her ingredients will make any traditional foodie just cringe.  Even through my own inexperience I could see that most of the ingredients were not healthy.

Salad Dressing like Olive Garden's
1/2 Cup white vinegar
1/3 Cup water
1/3 Cup vegetable oil
1/4 Cup corn syrup
2 1/2 TBSP grated parmesan/romano cheese
2 TBSP pectin
1 egg- beaten
1 1/4 tsp salt
1 tsp lemon juice
1/2 tsp minced garlic
1/4 tsp dried parsley
1 pinch dried oregano
1 pinch red pepper flakes

--Combine all ingredients in blender on medium speed for 30 seconds to a minute. Blending well is key to a smooth, thick dressing. Under-blending will result in a runnier dressing. Chill 2-4 hours shaking occasionally. Keeps for 2 weeks, approx.

Happy Salad Eating!


Friday, April 20, 2012

Mexican Bean Soup

Along our journey of eating more whole foods, my precious peas are trying many new recipes.  One of the more recent ones was from the West Ladies, Homestead Blessings Cookbook; Mexican Bean Soup.  This is an amazing cookbook.  I got the cookbook for our daughter, Anne, for Christmas and since then we've tried several recipes; Better Than Carrot Cake Muffins and Chocolate Chip Skillet Cookies.

I quickly realized the other day that if all I do is "pin" recipes and ideas onto my pinterest page, trying nothing, then what really have I gained?   The least I can do is to share my trials, errors and/or successes.   So be ready, I plan on reporting the "testing out"  of my pinterest pins and new recipes that we are experimenting with.  But, back to the Mexican Bean Soup. . . . .

Mexican Bean Soup

2/3 cup dried pinto beans (soaked over night) 
2/3 cup dried red kidney beans (soaked over night)
2 TBSP dried parsley
1 TBSP chilli powder
2 tsp. cumin
1 tsp. dried oregano
6 cubes chicken bouillon (No MSG)
1 cup wagon wheel pasta, uncooked
1/2 cup brown or wild rice


Rinse beans after soaking over night.  Place in a large stockpot with 4 cups of water.  Bring to a boil, cover and remove from heat.  Let sit for 1 hour.  Drain beans and return to pot.  Add 8 cups of water and contents of flavor packet.  Bring to a boil, reduce heat, cover and simmer for 1 hour or until beans are tender.  Stir in rice and bring to a simmer.  Cover and simmer for 20 minutes.  Uncover and stir in pasta and 1/2 c water.  Simmer 10 minutes.     Makes 8 - 10 servings


Quick Note:  I did not use pinto beans as we did not have any, so I used black beans instead.  I also used homemade chicken stock instead of the chicken bouillon.  I also used regular whole wheat pasta.


I wish that I could paint a rose colored picture of this recipe, but even with these small substitutions, the verdict rang in that it was just okay- not a keeper recipe to cook each week.  Dear hubby said that it needed some kind of acid base, like crushed tomatoes and some type of meat (he's a tried and true meat and potatoes man with EVERY meal - I'd love to change that about him, but changing a man should be left for another post).  The girls turned their noses up to the soup and pushed all the beans off to the side.

I think we'll try the recipe again with some of the suggestions that dear hubby offered up and see what results we get.  As I said before, this is a journey and sometimes along the way we stumble, but what a blessing that we can try again tomorrow with another recipe.

Friday, April 6, 2012

whole foods journey

Have you ever spent every possible free moment indulging your desire to learn something new?  It seems like our librarian knows exactly what books to have ready for me when we visit the library each week.  If my eyes are not glued to one of Steve Solomon's gardening books, then I'm constantly absorbing as much information from a couple of new blogs.


Back in February I began telling about my burden to feed our family better; with whole foods, the way that God intended for our bodies to be fed.  While on this journey, I have been learning the reasoning behind many topics I've been exposed to over the years, but never really understood their importance, such as eating organic foods, sprouting wheat, and soaking grains and nuts.


So, I thought I would share the two websites that have been instrumental in my learning.


The first ~ the Weston A. Price Foundation


This is a good place to start.  It has several articles, by Sally Fallon, author of Nourishing Traditions.


The second ~ the Healthy Home Economist

My favorite part about her site is her extensive library of "how to" videos."  I have always loved learning via visual images and each of her videos are very informative.


Leave me a comment and let me know what you think of the sites.  Do you have something that you are passionate about learning?

Monday, January 16, 2012

Mint Tea

When my mint is not being consumed by the slugs in my front yard, it grows quite prolifically.  Amazingly, it is also continuing to grow through our mild winter months!  So, with that in mind I decided to try my hand at mint tea like the West Ladies teach on their "The Art of Herbs" DVD.

Since the mint is right outside my front door - quite handy if I say so myself - I gathered a rather large bunch of mint stalks (really just enough to cover the bottom of a medium sized bowl), pulling all the leaves off and putting them into a bowl.  I didn't take the time to measure the water in the bowl, nor do the West Ladies, so if I had to guess, it was probably 4 - 6 cups of cold water that was added to the bowl.

Here's the fun part, take your hands and squish the leaves down into the water.  There is not an exact "squishing" time to follow, so I quit when the water turned bright, minty green.

Get your pitcher ready . . . you'll need a piece of cheesecloth, larger than the top of your pitcher.  Strain the juice into the pitcher, catching all the leaves.  The best part of this, if that didn't make enough tea, you can go back to adding more water to the bowl and squishing the same leaves all over again.  Don't forget to compost the mint leaves once you are done with them.

Now I added about 2/3 cups honey and stirred really well.
The first taste was "WOW!"  I thought I had just swallowed a pack of mint gum.  It was very strong and not so appealing.  The frugal girl inside of me decided to let the tea sit in the refrigerator for awhile (before throwing in the towel by throwing the tea to my plants) and see if the mint and honey merged to make a more mellow "mint" taste. 


The next day turned out to be much better.  When I poured another glass, instead of "WOW" it was "OOOOH" that's really good and fresh tasting.  What a great way to use mint! 

Now, it's your turn - How have you used mint?

Wednesday, August 3, 2011

Hold the Mayo Please

Soon potatoes will be harvested here in Northern California; providing a wonderfully tasty staple throughout the winter months.  We as a family love to make some very yummy recipes with potatoes such as Corn and Red Pepper Kielbasa Soup, Pot Roast with roasted potatoes, Beef Stew and Chicken and Dumplings.  But it was this recipe that stole the hearts and stomachs of everyone who attended our 5th Annual Bibby Birthday Bash this last weekend .

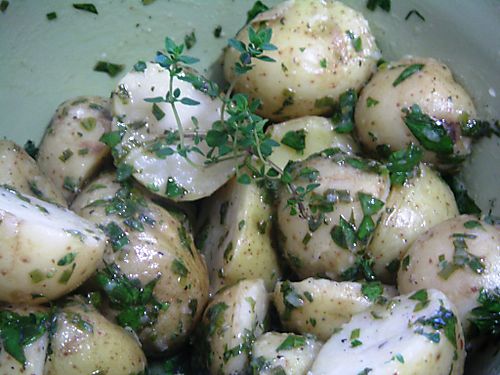
French Potato Salad


French potatoes

2 lbs Small Red Potatoes
2 TBSP Dry White Wine
3 TBSP Champagne Vinegar
2 TBSP Chicken Stock/Broth
1/2 tsp. Dijon Mustard
2 tsp. Salt
1/2 tsp. Pepper
6 TBSP Extra Virgin Olive Oil
1/4 c Green Onions
1 TBSP Fresh Dill, minced
1 TBSP Parsley, minced
2 tsp. Basil

Boil a large pot of water; cook potatoes until cooked through - about 20 minutes.

Let cool and cut potatoe in half into a large bowl.  Add wine and chicken stock; let the liquids absorb after tossing.

Meanwhile combine vinegar, mustard, salt, pepper, and olive oil while wisking.  Add the vinegar mix, onions, herbs and toss well.

I'm looking forward to trying this over the winter months.  I especially like that it doesn't contain mayonnaise - - the majority of our family balks at the thought of mayonnaise in a recipe.  Be sure to let me know if you enjoy this recipe.

Saturday, November 20, 2010

Sweet pumpkin cookies

DSC_0543-1.JPG

I'm anxiously awaiting to try this recipe.  It's just another use for the many jars of canned pumpkin we have stored up in our pantry.  The littles one and I are going to make these for our homeschool Thanksgiving celebration tonight.

Read the rest over at Raising Homemakers

May your weekend be filled with sweetness. . . .